_______________________________________________________________________
XTile
An automation for making tiles and applying standard error correction techniques for DNA self-assembly
_______________________________________________________________________
How it Works Page for XTile version 1.2
________________________________________________________________________________________________________________________
Before you begin: some essential points:-
1. The inputs/outputs on each face are to be given from left to right order.

2. Currently only four gate operations are allowed.
AND gate, is represented by "." (dot) between the operands (e.g. "a.b" represents a AND b).
OR gate is represented by "+" (plus) between the operands (e.g.. "a+b" represents a OR b).
NOT gate is represented by "~" (tilde) before the operand (e.g. "~a" represents NOT a).
XOR gate is represented by "^" (circumflex accent) between the operands (e.g. "a^b" represents a XOR b).
3. More than one inputs to a face can be given, by separating then with "," i.e. commas.
(e.g. "a.b,a+b,~a" represents a AND b, a OR b, NOT a as inputs/outputs on a face).
4. If more than two operands are used in a single input/output, then brackets must be used to cluster two operands and an operator. (e.g. "a.(b+c)" represents a AND (b OR c) ).
5. Do take care in using NOT gate, as it is a gate too, and can't be placed next to another gate operator without using brackets.
So if you wish to write a AND (NOT b) then give the input as "a.(~b)".
6.Error handling has not been implemented till now. So if you don't follow the directions, errors and exceptions are surely expected.
____________________________________________________________________________________________________________________________
What is XTile ?
XTile, as its name suggests is primarily developed to assist in creation of ".tiles" files which are executed in Xgrow simulator, to simulate solutions to many a problems. As an additional help, it also integrates within itself functionality to apply basic error correction techniques on the created ".tiles" file. All you need to supply to it is the design of the computational tile (which is the most basic requirement for giving a solution to a problem ), and then choose the glues for frame tiles as per your problem requirements.
Step 2: Input the binary inputs to be supplied to the vertical and horizontal frame tiles and then press 'Submit frame glues' button.
The desired '.tiles' files with the
specified design and the frame inputs provided would be displayed in the
window, from where it can be copied to a text editor and saved as a
'.tiles' with a name given as per the user.
_______________________________________________________________________________________________________________________________________________________
[ basic .tiles generator]
~+~+~+~+~+~+~
XTile 1.1 applet download page
[basic .tiles generator with proofread and snake error correction schemes application functionality]
~+~+~+~+~+~+~
XTile 1.2 online applet for 2 way Compact error correction Scheme
XTile 1.2 online applet for 3 way Compact error correction Scheme
[compact error correction schemes application standalones]
~+~+~+~+~+~+~
~+~+~+~+~+~+~
Contact us at xtile@guptalab.org
Developed by: Anshul Chaurasia, Sudhanshu Dwivedi, Prateek Jain.
©2009.Self-Assembly Group, (a part of Laboratory of Natural Information Processing )
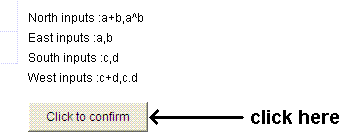
Step 2: Check all the inputs you entered for the four faces, and then click on 'Click to confirm'.
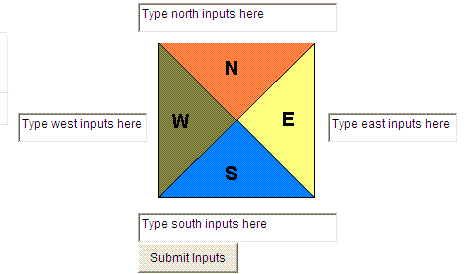
Step 1: Describe the design of the computation tile by entering the inputs/outputs on all four faces of the tile.
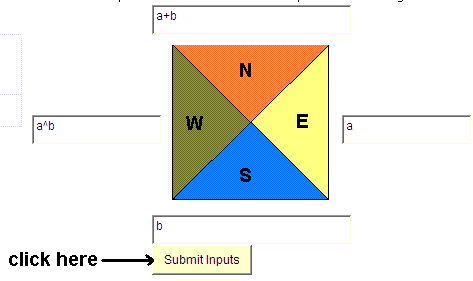
example : we wanted to enter "a+b" on north face, "a" on east face, "b" on south face and "a^b" on west face. So we enter as shown above and then click on the 'Submit inputs' button.
~~~~~
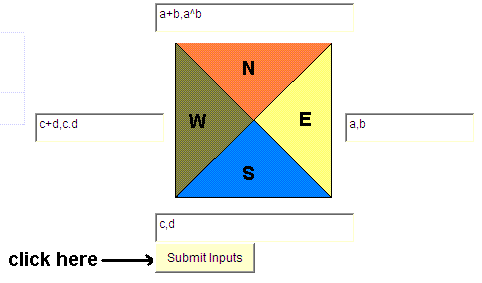 example : we wanted to enter "a+b"
and "a^b"on north face, "a" and "b" on east face, "c"
and "d" on south face and "c+d" and "c.d" on west face. So we enter as
shown alongside and then click on the 'Submit inputs' button.
example : we wanted to enter "a+b"
and "a^b"on north face, "a" and "b" on east face, "c"
and "d" on south face and "c+d" and "c.d" on west face. So we enter as
shown alongside and then click on the 'Submit inputs' button.