_______________________________________________________________________
XTile
An automation for making tiles and applying standard error correction techniques for DNA self-assembly
XTile produces input files for The Xgrow Simulator to simulate growth of DNA Tiles
_______________________________________________________________________
XTile version 1.1 download page
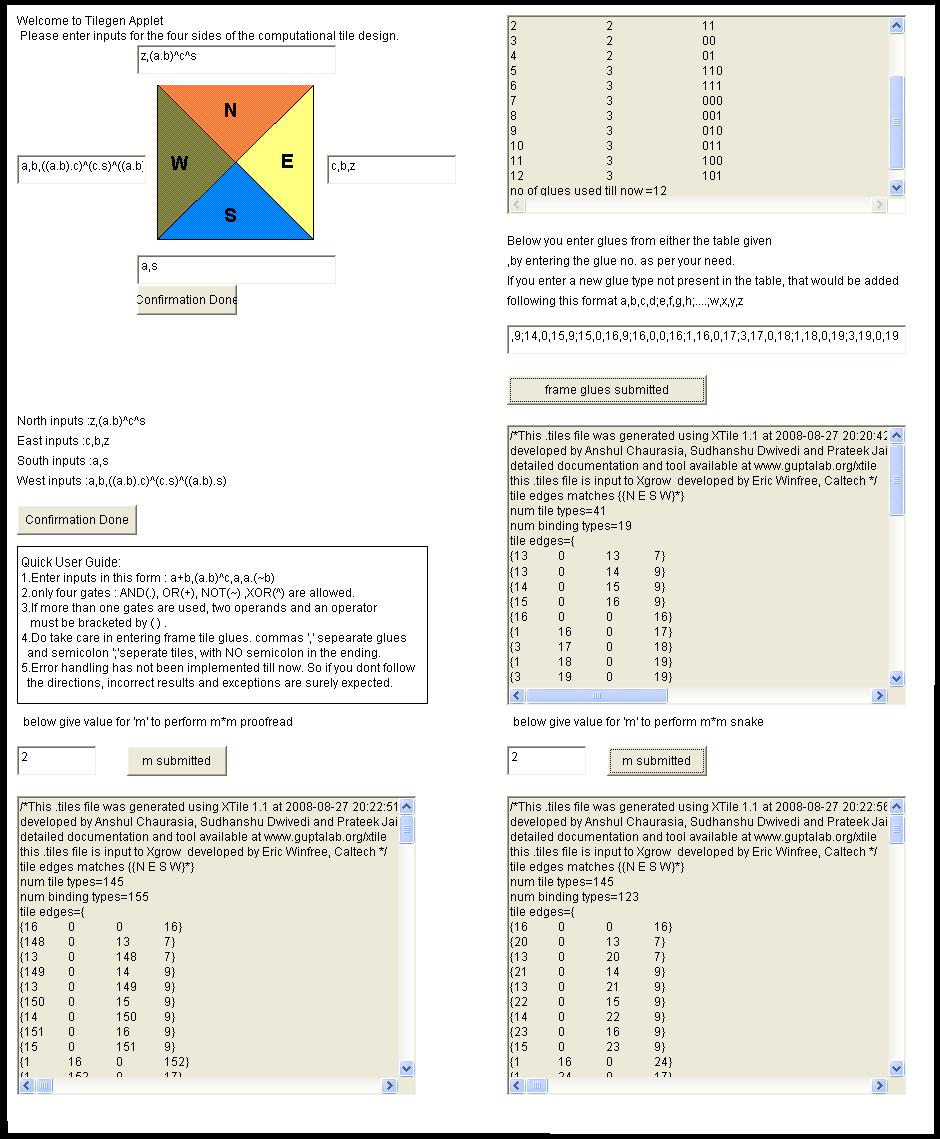
With the second version of our '.tiles' files generator, we enter into much more research phase as we now provide automated application of Proofread error correction technique, Snake error correction technique and Compact error correction technique. While the Proofread and Snake have been successfully incorporated within the XTile framework applet, the Compact scheme is still under development and is currently available as a standalone framework (not included in XTile version 1.1 package).
Unlike the previous XTile version 1.0, which was a web based solution, the version 1.1 is a zipped package which requires to be downloaded onto your computer system, then after following some very simple steps for its installation, it can be executed through the specified file.
XTile 1.1 (for windows)
XTile 1.1 (for UNIX / OS-X)
[right click and choose save target as, then save it on your desktop]
Steps for installation:
1. Unzip the package. In the folder named "XTile" there will be three files -
Tilegen.htm - the webpage that opens the applet Tilegen.class file
Tilegen.class - the applet class file for XTile version 1.1
tilepolicyall - java policy file that authorizes a limited write access on your computer system, to the Tilegen.class file
2. As you might have guessed, we require a limited write access to you computer system, for storing temporary files that we create during applet's execution. The need for such a requirement arises because of the high number of calculations being done for applying error correction schemes, and we assure you that these files pose no harm to your computer system in any way. They will be generated on your desktop, and you can later delete them after you have exited the XTile version 1.1 applet, by closing down the webpage window.
3. The most important step is to be done by the user. Whenever you run an applet, or an application with a security manager, the policy files that are loaded and used by default are the ones specified in the "security properties file", which is located in one of the following directories:
Windows:
java.home\lib\security\java.security
UNIX:
java.home/lib/security/java.security
Note : The java.home environment variable names the directory into which the JRE was installed.
open it in an editor suitable for editing an ASCII text file.
Then add the following line after the line starting with policy.url.2:
Windows:
policy.url.3=file:${user.home}/Desktop/XTile11/tilepolicyall
UNIX:
policy.url.3=file:${user.home}/XTile11/tilepolicyall
On a UNIX system you can also explicitly specify your home directory:
policy.url.3=file:/home/XTile11/tilepolicyall
4. Now to run the XTile version 1.1, open the Tilegen.htm webpage, the applet will be loaded in it. You can enter the value of m for an m*m scheme for proofread and/or snake error correction scheme. The resultant output '.tiles' file code will be displayed in a corresponding window. You need to select the entire code and paste it in a text editor, then save it with a name of your choice with a '.tiles' extension.
[basic .tiles generator]
~+~+~+~+~+~+~
XTile 1.2 online applet for 2 way Compact error correction Scheme
XTile 1.2 online applet for 3 way Compact error correction Scheme
[compact error correction schemes application standalones]
~+~+~+~+~+~+~
~+~+~+~+~+~+~
Contact us at xtile@guptalab.org
Developed by: Anshul Chaurasia, Sudhanshu Dwivedi, Prateek Jain.
©2009.Self-Assembly Group, (a part of Laboratory of Natural Information Processing )